|
Purpose:
Bone stock the WRX is one of the best performing
25k cars you can find, but there's always room
for improvement. Replacing the stock 2.25"
exhaust and it's 2 catalytic converters with a
3" turbo-back exhaust, featuring one high flow
cat, should allow the turbo to spool up easier
and quicker for more low end grunt. Another
benefit is the super quiet stock exhaust tone
should be replaced with a more sporting tone.
Along with these goals of performance and aural
enhancement, we also wanted to keep the sleeper
look our wagon bodied WRX affords. Lucky for us
M2 Performance had just the ticket, a 3" turbo
back exhaust with a dual tip muffler. M2
originally specialized in Mazda's only, but with
the release of the WRX in the states, M2 has
jumped into the WRX market with a vengeance and
has already built up a good reputation within
the Subaru community. The look of the M2 system
is so close to stock that your local racer might
not be able to tell the difference. For those of
you who want a more obvious look, 4 and 5"
single tip mufflers are also available.
Disclaimer:
Perform this installation at your own risk. We
do not assume any responsibility whatsoever for
any damages of any kind resulting from any
information printed in this article. This
article was created as a supplementary resource
and should not be used as the lone source of
information on this topic. We recommend that you
seek the advice of a trained professional. This
is simply a guide to show users how we
accomplished our own installations for our
Project Car.
A few tips for installation:
1. Make sure the vehicle has had
sufficient time to cool down. We allowed our WRX
to cool off for 3 hours with the hood up and it
was still very warm to the touch!
2. Gather all tools you'll need before
you begin.
3. Spray all bolts with a lubricant such
as Liquid Wrench or WD40 and allow to penetrate
for about an hour.
5. Use protective eye wear. Our tools
consisted of a socket set, box end wrenches, an
adjustable wrench, wire crimpers and some wire
snips.
|
|
Parts Installed:
M2 3-inch Stainless Steel Turbo-Back Exhaust
System
|
 Step
1: Step
1:
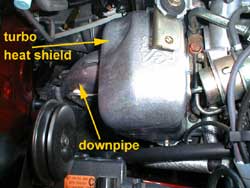
Remove the heatshield. You'll be amazed at the
amount of bolts used to hold on this simple
piece of metal. There are 5 on the left side
(viewing from the front of the car), one on the
back, and two on the right side. After you have
all the bolts removed you're going to need some
keen geometry skills to get the heat shield out
of the engine bay but once you do, the downpipe
to turbo connection is easily available. Once
the downpipe is exposed look for the bottom
heatshield. It connects to the downpipe by one
bolt.
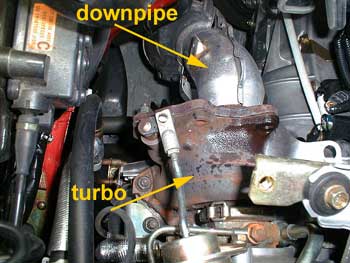
Step 2:
Loosen the downpipe. There are only 5
bolts holding the downpipe to the turbo.
They are surprisingly easy to get to.
Now would also be a good time to remove
the O2 sensor from the Downpipe.
Reference Step 5's picture for it's
location.
 |
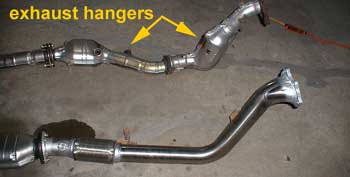
Step 3:
Disconnect the remaining hangers. We've
used photos of the exhaust out of the
car in order to point out where the
hangers are in relation to the whole
system. Install the new Downpipe by
lining up the turbo/ downpipe bolts then
securing the hangers. There are 2
hangers for the downpipe shown here. The
front one bolts into the tranny. The
second rests on a J bracket and is
screwed in.
|
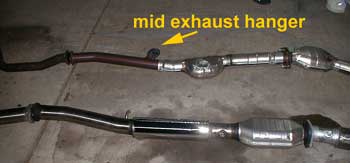
Step 4:
Hooking up the Midpipe. This one is very
easy. Simply use the gasket provided by
M2 to join the downpipe to the midpipe.
Then use the stock rubber hanger and
presto!
 |
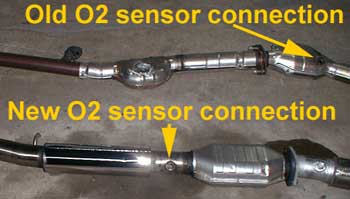
Step 5:
With the Midpipe in place it's time to
relocate the O2 sensor. This step is
required since the M2 system has it's
cat in the midpipe. Without the O2
sensor plugged in, you can expect to see
a check engine light come on. We had to
splice the O2 sensor to extend it the
12" or so required to reach the new
bung, but have since learned that this
step might be unnecessary due to some
extra length of O2 wire tied up in the
engine bay.
 |
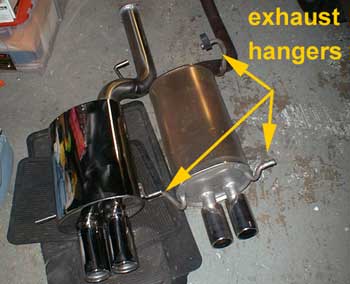
Step 6:
Hanging the muffler. Once again we used
the stock rubber hangers with no
problems. Once you have everything in
place it's time to tighten it all down.
Double check everything, start her up,
and check for exhaust leaks. If
everything looks ok, put the head shield
back on. Note: Heatshield will require
some modification. See step 9.
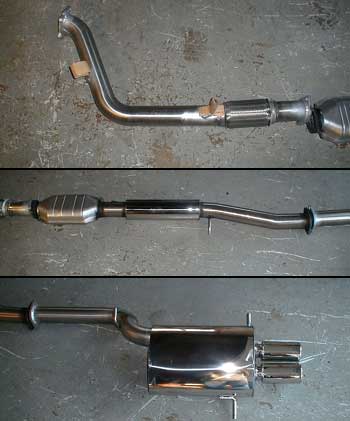
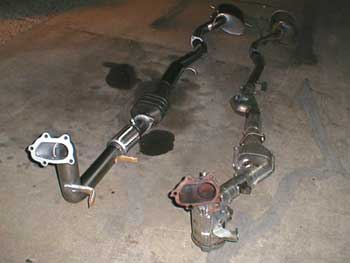
Step 7:
Here's a side-by-side comparison
of the M2 and stock exhausts. As
you can see the M2 has less
bends, one less cat, a nice flex
section to protect the exhaust,
and way less restrictive
downpipe to turbo connection.
 |
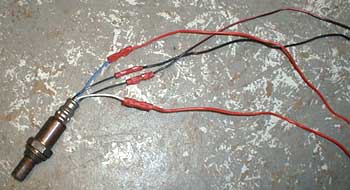
Step 8:
Here's the O2 sensor spliced to
extend to the Midpipe. As
mentioned before this step may
be unnecessary if you're able to
stretch the factory wiring
enough to reach the new
location.
|
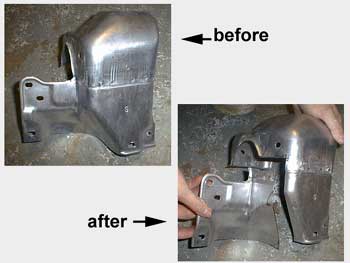
Step 9:
The heatshield required a little
reworking in order to fit around
the larger diameter downpipe.
 |
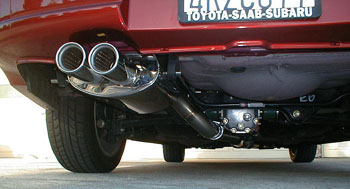
Step 10:
This is what the M2 exhaust
looks like fully installed. One
minor sticking point is that our
muffler seems to be slightly
(1/2") off center. As you can
see the system is tucked under
the car very well and there is
very little room left. This
could be a contributing factor
to the variance.
 |
The M2 3" Turbo-Back Exhaust fit
our goal of keeping the stock
look, only the polished finish
gives it away with anything less
then a close inspection. In
terms of driving feel the WRX is
really transformed. Low-end pull
is significantly improved and
bogging due to turbo lag is now
non existent. M2 claims
customers can expect up to a
15hp gain from the system and
our finely tuned butt-dynos tell
us that's just about right. |
|
|